Grumman Wildcat Eduard 82201
Task to accept brutal punch of Japanese very offensive and agile fighters in first period of war over Pacific, fell on Grumman Wildcat. Alongside with Buffalo, it was backbone of the US Naval fighter forces. In todays terms, Wildcat was very advanced designed, mid wing position generate less drag, landing gear mounted in fuselage (so less stress for wing, less weight), slightly raised pilot cockpit with front fuselage a bit step down. Take a look and will see identical design in F-16. Radial engine was more resistant to battle damage and less weight. No matter of that, Japanese opponents was better so pilots of Wildcat had hard task in fighting them.

Never before I built Wildcat so it is my real pleasure to first one be from Eduard. Its their brand new kit and as always, very good selection!! Scale is 1/48 and in this moment new releases is available. For this very first kit, they choose model F4F-3, ProfiPACK, stock code is 82201. As you guess, rich and good kit package, box have so nice art of Wildcat in fight. Inside box is first at all full color assembly booklet with appendix, to correct some error made inside. So take a look first all this, make a good insight into instruction before start build. Same kit come on six fret, on of those is transparent, of very precise made parts, then pre painted etched set, mask and two sheet of decals. Plastic parts look extraordinary and assembly instruction indicate some a bit sophisticated built stage, as with engine mount and landing gear.
Build
What really is interesting is intensive deep green color of the cockpit interior. Wildcat is known by that feature and tanks to some preserved samples of this color, I managed good selection of paint from my side. So entire parts are primed black while they are still on frets and then was removed, semi assembled and painted green. Not all parts are in green color, some elements are in grey color and this is mostly related to landing gear parts.
no images were found
Cockpit is first to be done and there is few variations, depends from which version you choose to built. There is much in use etched parts and they provide options, as well some area can be also be covered with decals. From my side I used etched parts as much as possible. They are mostly painted and no need to be painted. Note that some elements are in interior deep green color, so those who have no paints recommended in assembly instruction, can use it as reference for own mix of paint. Cockpit are consist of front section with instrument panel on it, rear section with frame and pilot seat (of course several other elements), and two side consoles with instruments. They are separately made and then joined together, side consoles connect all together, they are to be glued into their pin holes. There is not much to be add on cockpit fuselage sides.Engine mount is a bit complicated, need attention and experience and is good reason that this kit need a bit advanced modeler. Basic part is L14 and it present fuselage frame with wing span. This span make guide rail in later step when wing have to be attached. So on this frame, painted in grey by the way, goes first element painted dark and over it is to be built structure from very tiny parts. True- they are so accurate and their position is so precisely determinate, so it make it somehow not so problematical to be assembled. Other good thing is that they correct and direct each other, for example the first three things to be placed are engine mount parts L22, L23 and N35 and over them comes rear engine section N4. It lay over previous mentioned mounts into proper slot so when place it, it correct their positions, angles and even push it precise into their slots if they are not placed properly. So my advice is to do this assembly step into one pas, later could be problem to remove mount if it is not good place from very start. So- place L22, L23, N34 and N4 in one pass!! Once you did it, rest of assembly will go absolutely easy, few remained parts will be placed with absolute precision and easy.
That is most complicated part of the build and after that, rest goes with less attention. Now need to assembly two fuselage half’s, front section with engine mount and cockpit. Inside fuselage is depression where frames need to go, simply press inside assembly section and use capillary action cement to fix it in place. Close with another fuselage part, if need use some holders and leave it to dry.
Wings are so easy to build, thanks to fact that they don’t carry much, so whole interior parts are cooler with etched part on it. They also have guns but they will be used at very end, when kit is completed. Wings at bottom need to carry pylon and there is holes which need to additionally drill. If you miss this drill, no worry, outside you will see two rings at bottom, you can drill it from outside at very end of build. So you have port and starboard wing, each have top and bottom part, elevon and cooler. So simple. Join it all and then just slide on fuselage, you have so precise where they have to be place. Overall impression of the kit parts are highest possible, Eduard did masterpiece of engineering and part design.


Now front section of kit and there comes engine cowling and engine. Three parts create engine cowling and engine is consisted from just four parts and this is enough to make so authentic look engine! What really impress me is that Eduard did not waste time to make rear section of radial engine, they are not visible and who need extra detailed engine, it can be obtained as separate product. This what get in kit is just enough, simply and perfect! Once the engine is completed, and before that painted, put it on rear engine, mounted before and just slide engine cowling over it. This is it, engine completed in short time.
Landing gear is next and due to complexity of parts, I would like also to recommend to do em all in one pass, to allow them to correct it self into proper assembly position. They are all placed on fuselage frame and with some care, no matter of complex look, they can be completed fast. Lets explain- parts L1 and L2 goes on main landing gear elements. But angles are not explained in assembly, they are attached on bottom section of engine assembly. They have its slots so this is not big problem. Then comes parts L6 and L7 which give absolute proper angles and fix all landing gear into proper geometry!! It look complicate but it is not, just do it in one pass and not problem at all. This mean not to use extreme fast cement, apart you are incredible fast and precise builder. When this is over, just need to put two parts for landing gear doors and this step is over.
no images were found
In next step have to do rear wheel and main wheels. Main wheel don’t have to be done in this step, better do em later. Note tat wheel cover is black inside and camouflage color outside!! In front of landing gear are two slot to place exhaust pipes. Cockpit interior just need to place gun sight and you can then prepare cockpit canopy parts. Cockpit canopy have windshield and two options for sliding hood, open or closed one. I select closed variant. Over them need to put mask and put it on fuselage and close cockpit. Few ore small parts need to be placed, like aerial must but some other like signal lights, pylons, guns… best to use it at very end.Painting
Grumman Wildcat is so interesting as well no other US Naval fighter, used almost all known fighter camouflage patterns during its wartime service. It start with aluminum pattern and end with Sea Blue overall camouflage, so Eduard will have many of variations and options for this kit. Above is mentioned Bronze-Green interior color and it is used on Grumman built airplanes, all those built by GM-Eastern Aircraft have standard Interior green cockpit. Sample machine I decide to built had standard two tone camouflage of Blue Grey at the top surface and Light Gull Grey at bottom surface. For a long time I was bother by presentation of the Blue Grey, from some reason, many times shown as medium grey blue color, and actual color was far darker.
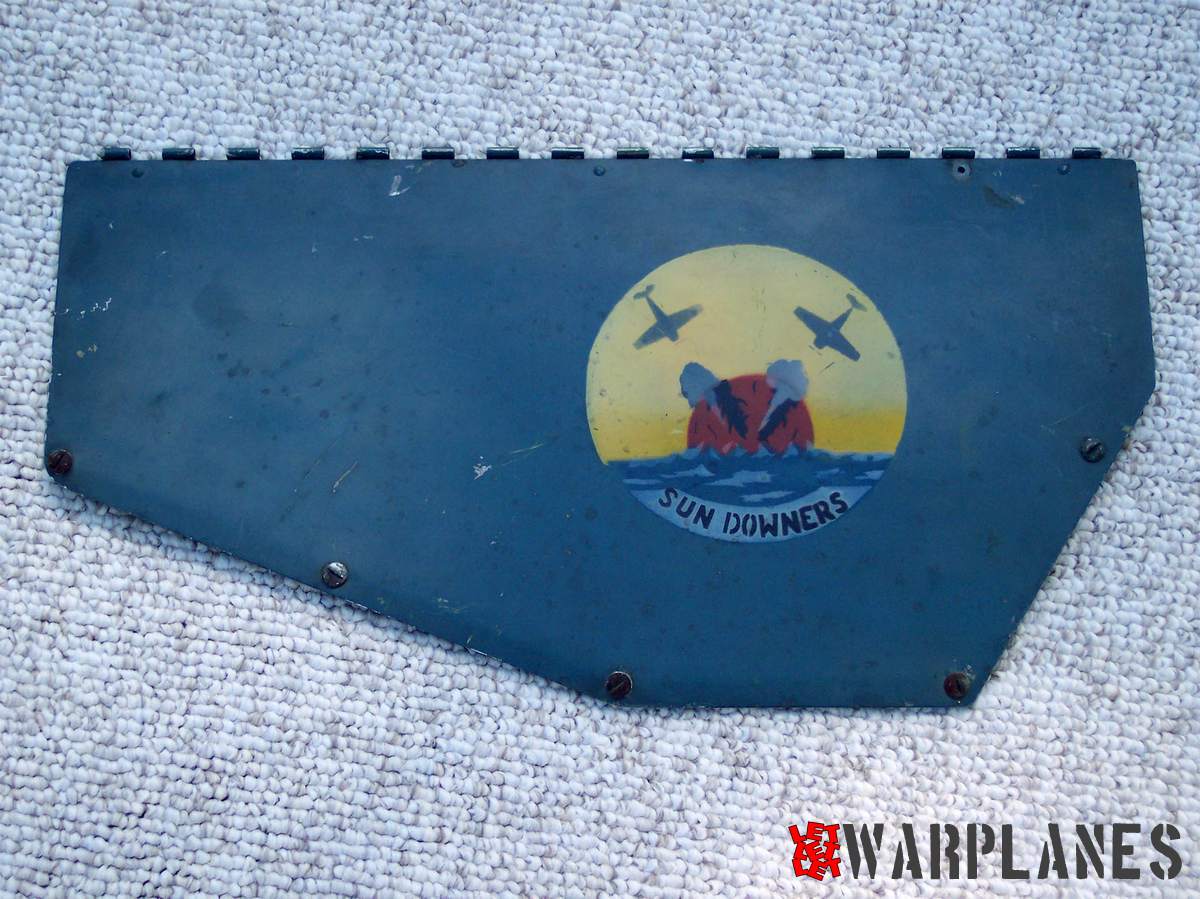
Presented here is VF-11 F4F panel (photos courtesy of R. A. Leonard). Plane was flown by Naval Ace Lt(JG) William N. Leonard and his VF-3 plane was a standard VF-3 F4F-4 mount, overall blue-grey with light grey undersides, VF-3 insignia on the instrument panel access hatch. So, his F4F, bureau number 5244, was struck below to the hangar deck where they painted over the white 25 with blue-grey, and when dry, painted on a fresh white 13. This panel shown above was removed from this sample which was exposed to tropical sunlight for a few months and as you see, it is still so dark. This artefact is kept in collection of his son.
Painting I did start with tiny coat of black primer and then I paint camouflage colors. I use my own option for Blue Grey and it look suitable for me. Once they was completely dry, I paint a coat of gloss varnish and kit is ready for decals.
First US Navy Ace in WW2
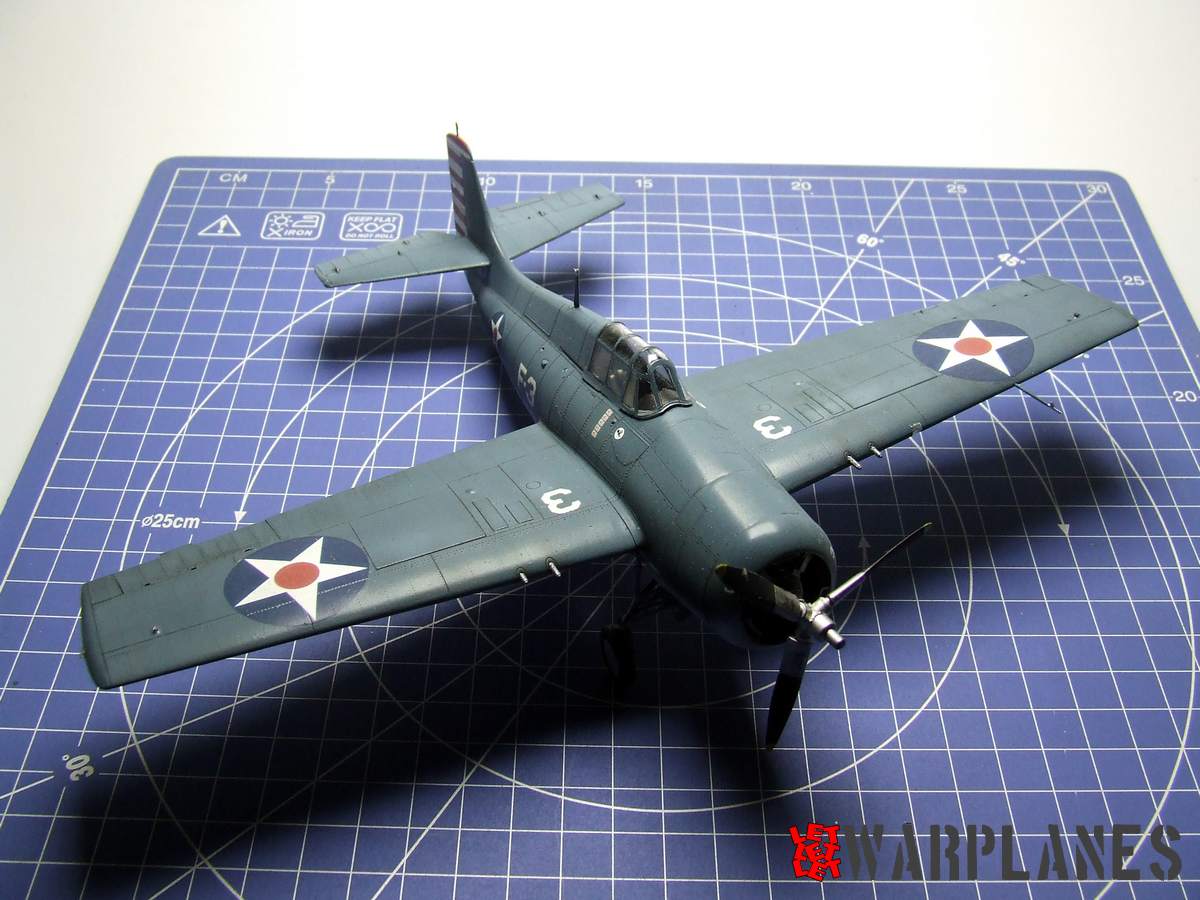
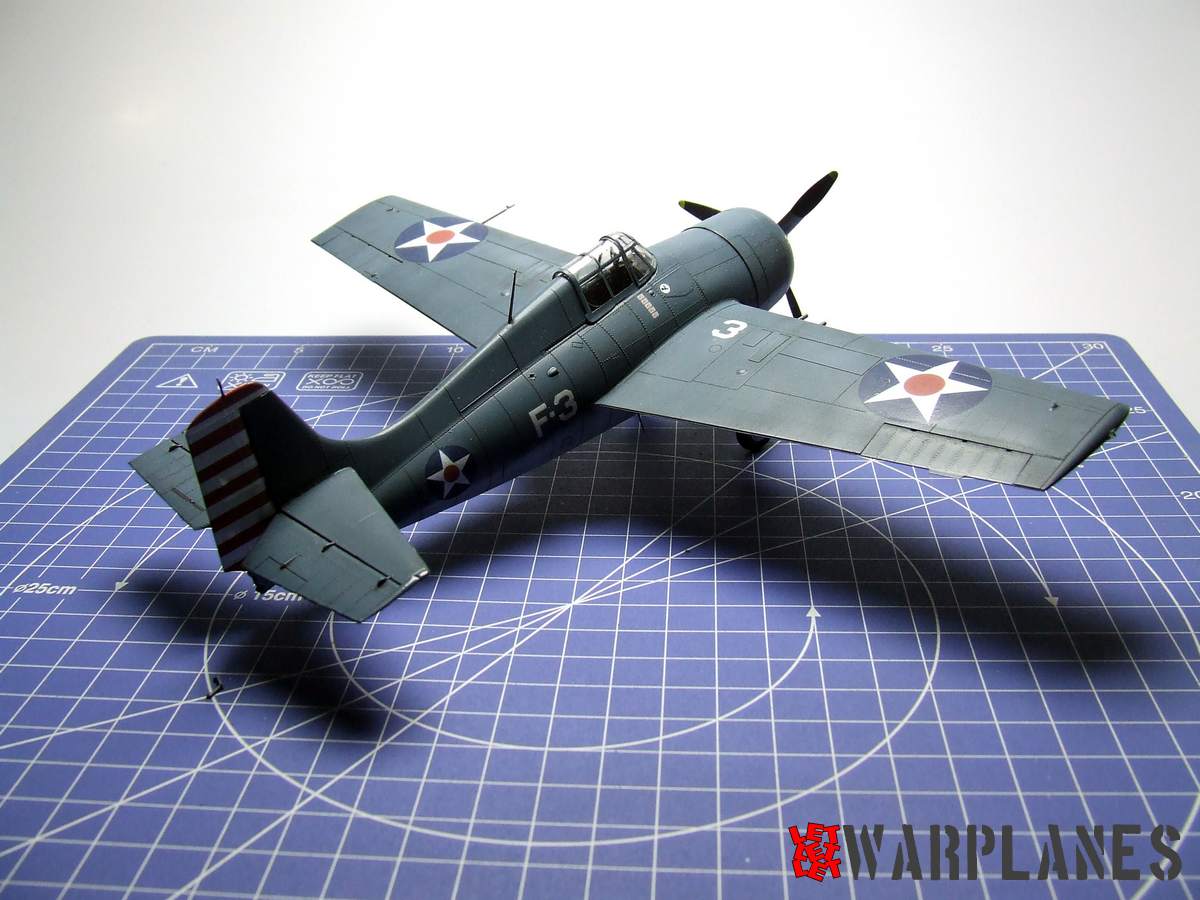
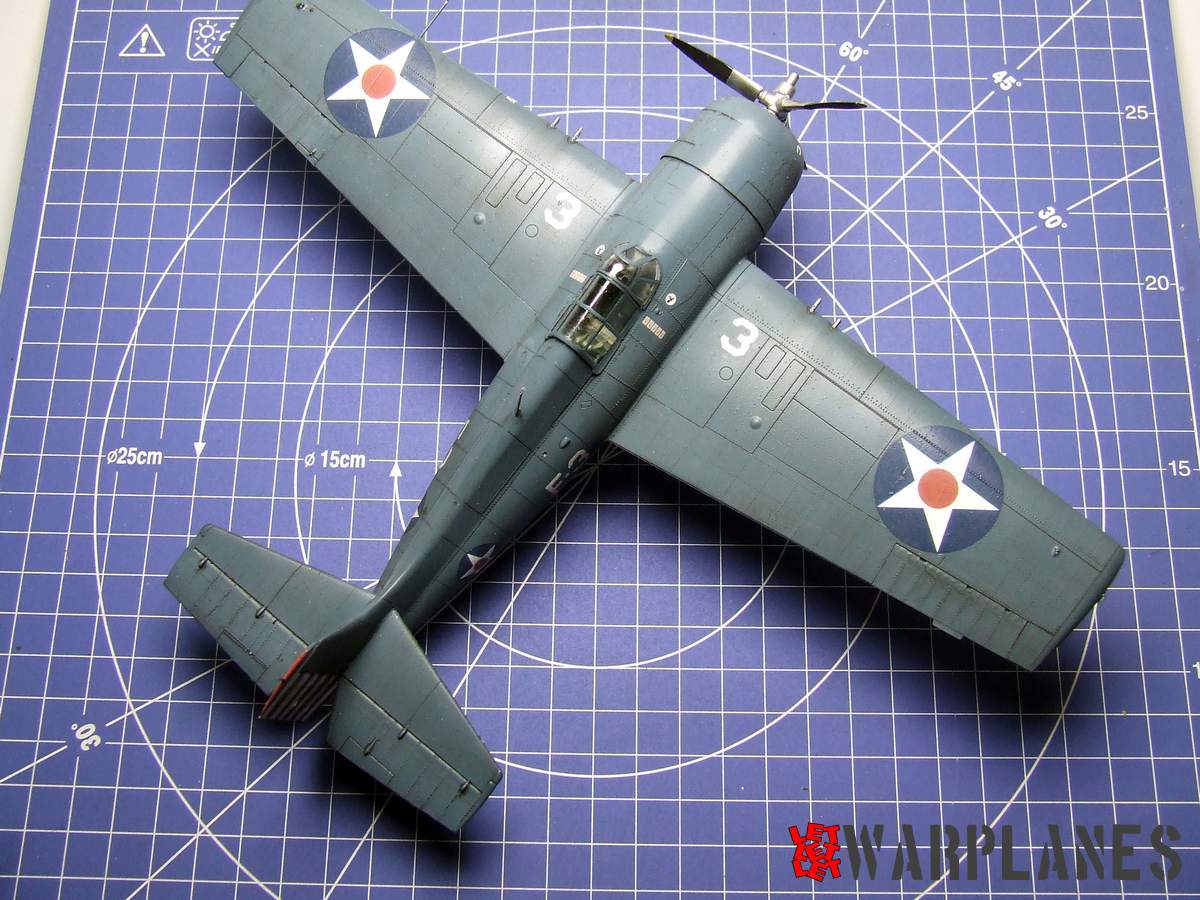
I decided to make kit under letter C in Eduard painting list, airplane flown by Lieutenant Edward H. Butch O’Hare. Edward “Butch” O’Hare graduated from the Naval Academy in 1937. He was awarded the Medal of Honor for shooting down five Japanese planes on 20 February 1942, while he was defending USS Lexington during an attempted a raid on the enemy base Rabaul. Butch O’Hare was a naval aviator who became the U.S. Navy’s first flying ace and Medal of Honor recipient in World War II. He was killed in action Nov. 26, 1943. In 1949 the Chicago, Ill., airport was renamed O’Hare International Airport in his honor.
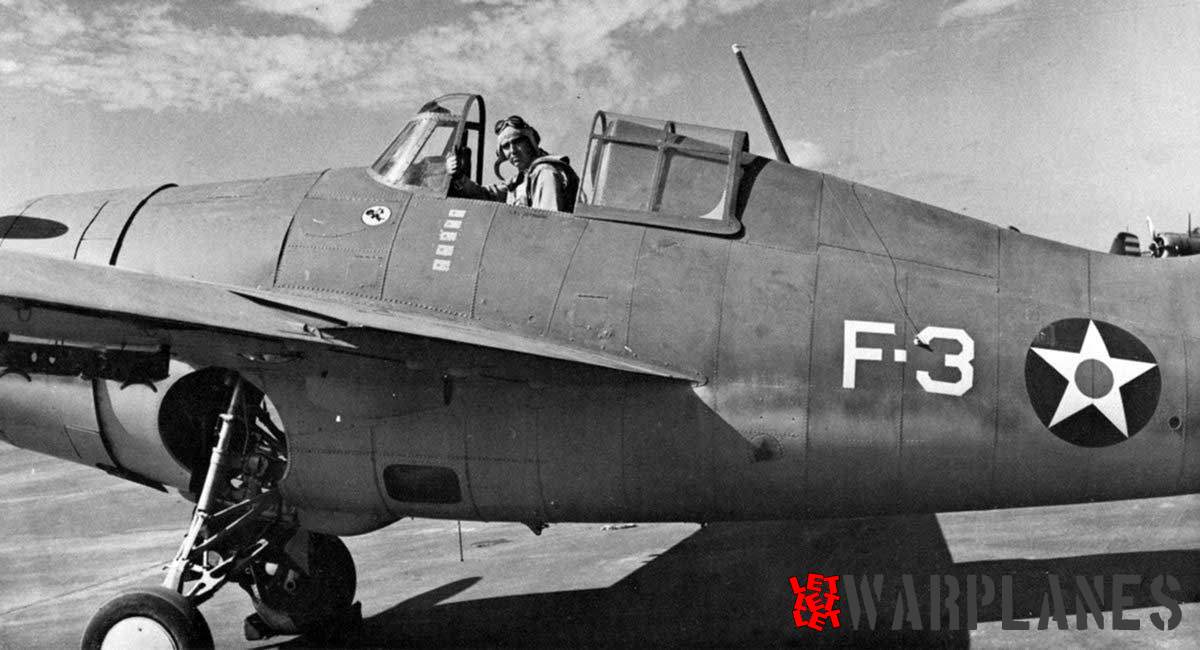
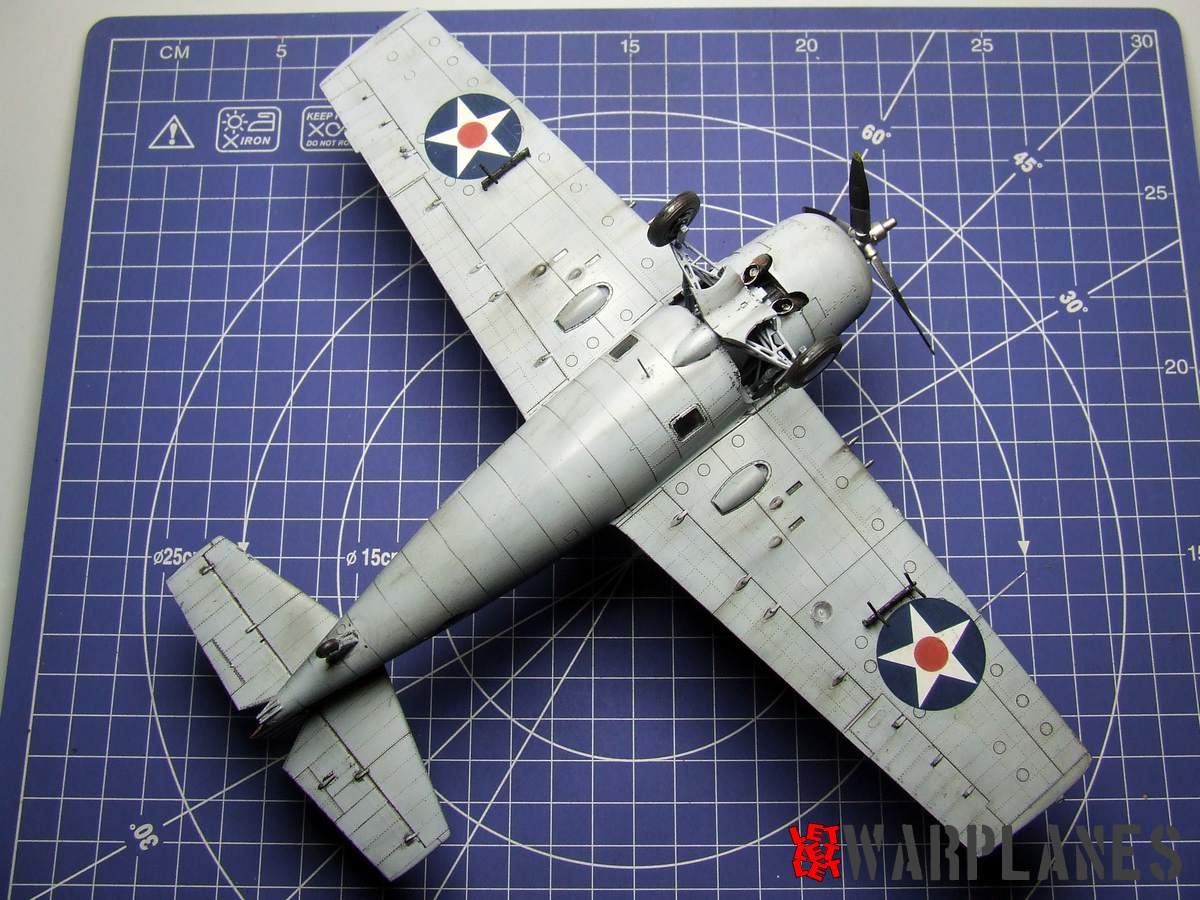
Kit have early markings with red-white strips on vertical rudder and national insignia in six positions. That was early stars, no bars, with red dot inside white star. His personal machine have F-3 on fuselage sides, numbers 3 on the wing top surface and small victory marks under the cockpit, on both sides. Also there is unit insignia, just under the windscreen sides. Once the decals was applied on kit, I have gloss coat them and did some wash to represent some dirt and fade out of panels.
Final works
Not much remained at the final, attaching main wheels, guns, propeller. Protection of mask is removed at that stage and some additional wash strokes was done, to enhance engine exhaust trace at bottom. All navigation lights was place at very end as well two pylon at wing bottom. Photo of the original Butch O’Hare airplane indicate so dark color of this pylons, I decide to use black color but have no data for real color, so take care.
Eduard once again did outstanding job in releasing new kit project and I am definitely amazed with quality of this kit. Definitely will give my maximum recommendation for this kit, which you can find here! Big thanks to Eduard for sample kit for review!!
Srećko Bradić