Author Topic: April Group Build--F4U Corsair  (Read 76776 times)

Offline Second Air Force

  • Moderator
  • Hero Member
  • *****
  • Posts: 5777
    • View Profile
Re: April Group Build--F4U Corsair
« Reply #90 on: November 15, 2011, 08:01:58 PM »
Not so much damage as I had first thought. All the layers of paint are gone so a full examination could be done.
http://i174.photobucket.com/albums/w117/2AF/IMG_8595.jpg
April Group Build--F4U Corsair


The big issue on the fuselage is the opening I ground into it for the big cowl flaps that were on the Super Corsair. That is the huge glob of filler you see. Also I will have to cut off the cowl flap area just forward of the putty. Fortunately the spare cowl flap.firewall section from my other F2G-1D conversion was still in the spares as was a nose cowl ring. The rest of the engine cowl will have to be sourced elsewhere, but that's just a round tube.

The wing tips are CA glued in place with some wire spars for strength. A bit of filler on the tips and they'll be ready for the later steps. Also the leading edge inlets were hacked up and will need some work.

Offline No.1

  • Administrator and Owner
  • Administrator
  • Hero Member
  • *****
  • Posts: 23156
  • Owner: www.letletlet-warplanes.com
    • View Profile
    • LetLetLet - Warplanes
Re: April Group Build--F4U Corsair
« Reply #91 on: November 15, 2011, 08:07:05 PM »
Re conversion of conversion :))

Offline draken35

  • Hero Member
  • *****
  • Posts: 8724
    • View Profile
Re: April Group Build--F4U Corsair
« Reply #92 on: November 15, 2011, 08:49:47 PM »
 :-ok

Offline Second Air Force

  • Moderator
  • Hero Member
  • *****
  • Posts: 5777
    • View Profile
Re: April Group Build--F4U Corsair
« Reply #93 on: November 16, 2011, 07:13:56 PM »
A bit of fuselage progress. You can see how I puttied the accessory section outlet ducting with bondo during the first build of this monstrosity. The undamaged section sits next to it ready for trimming and installation. The second photo is obvious, just glued it together and then test-fitted the wing to the fuselage. A little filler and some sanding and I'll be ready to move on to the cowling scratchbuilding.
http://i174.photobucket.com/albums/w117/2AF/IMG_8602.jpg
April Group Build--F4U Corsair

http://i174.photobucket.com/albums/w117/2AF/IMG_8607.jpg
April Group Build--F4U Corsair

Offline draken35

  • Hero Member
  • *****
  • Posts: 8724
    • View Profile
Re: April Group Build--F4U Corsair
« Reply #94 on: November 16, 2011, 07:24:07 PM »
Amazing work...

Offline Second Air Force

  • Moderator
  • Hero Member
  • *****
  • Posts: 5777
    • View Profile
Re: April Group Build--F4U Corsair
« Reply #95 on: November 16, 2011, 08:19:28 PM »
For the life of me I don't remember why I cut the tips off of this propeller. It's the original prop from one of these Otaki kits so I dug in the junk box and found these three B-29 blades and the tips fit perfectly! Just a little glue, a bit of filling and sanding, and the prop is saved....
http://i174.photobucket.com/albums/w117/2AF/IMG_8608.jpg
April Group Build--F4U Corsair

http://i174.photobucket.com/albums/w117/2AF/IMG_8609.jpg
April Group Build--F4U Corsair


Oh, and that's the ring cowl I'll be reconstructing too, also from the old Otaki remains.

Offline No.1

  • Administrator and Owner
  • Administrator
  • Hero Member
  • *****
  • Posts: 23156
  • Owner: www.letletlet-warplanes.com
    • View Profile
    • LetLetLet - Warplanes
Re: April Group Build--F4U Corsair
« Reply #96 on: November 16, 2011, 08:46:24 PM »
Good rework ;)

Offline Sall

  • Sr. Member
  • ****
  • Posts: 4641
  • Build what YOU want,the way YOU want to,and above all-have fun!
    • View Profile
Re: April Group Build--F4U Corsair
« Reply #97 on: November 16, 2011, 10:08:28 PM »
Gooood job!! :-clap

Offline Second Air Force

  • Moderator
  • Hero Member
  • *****
  • Posts: 5777
    • View Profile
Re: April Group Build--F4U Corsair
« Reply #98 on: November 20, 2011, 08:15:43 AM »
Last night and again this evening I worked on the cowling reconstruction. I have two of the forward ring cowls from the Otaki kits but nothing else. With a little measuring I decided that some spare B-17 cowls would work with proper planning. Here is the cowl after splicing the parts together. The front is Otaki Corsair, then Revell B-17F, and the rear is Monogram B-17G. The extra pieces to the right show you what the starting point was.
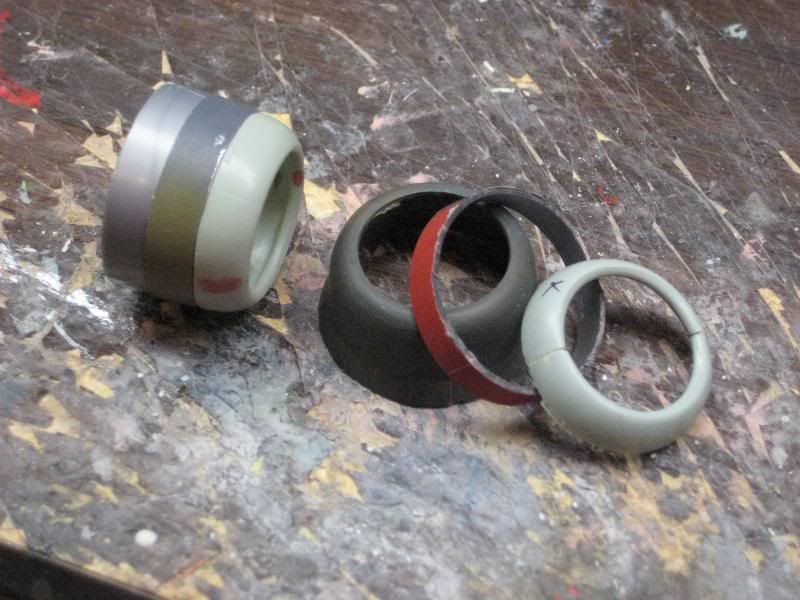
http://i174.photobucket.com/albums/w117/2AF/IMG_8616.jpg
April Group Build--F4U Corsair


After splicing and letting the glue completely cure it was an easy matter to use filler on the seams. The cowl sections all have a slight taper so a good amount of putty was needed. The easy way to sand this and keep the cowling perfectly round was to chuck it up in the lathe and wet-sand it until the surface was perfectly smooth.
http://i174.photobucket.com/albums/w117/2AF/IMG_8620.jpg
April Group Build--F4U Corsair


Then the inside of the cowling was smoothed and cleaned up and three small strips added where the three sections of removable cowling come together. A bit of primer and the cowl is complete.
http://i174.photobucket.com/albums/w117/2AF/IMG_8621.jpg
April Group Build--F4U Corsair


Now all the major parts are assembled and a first coat of primer sprayed on. Some fine-tuning and this will be ready for another coat of primer and then installing the windscreen, then paint.
http://i174.photobucket.com/albums/w117/2AF/IMG_8622.jpg
April Group Build--F4U Corsair

Offline No.1

  • Administrator and Owner
  • Administrator
  • Hero Member
  • *****
  • Posts: 23156
  • Owner: www.letletlet-warplanes.com
    • View Profile
    • LetLetLet - Warplanes
Re: April Group Build--F4U Corsair
« Reply #99 on: November 20, 2011, 08:36:58 AM »
Good to see that you have turning machine, I dream about multi practical machine for a long time. One company from Austria manufactured combination machine which sections could be assembled in various way and get turner, milling machine, drill...

Excellent work mate!

Offline draken35

  • Hero Member
  • *****
  • Posts: 8724
    • View Profile
Re: April Group Build--F4U Corsair
« Reply #100 on: November 20, 2011, 09:46:05 AM »
Amazing work once again!!!

Offline Sall

  • Sr. Member
  • ****
  • Posts: 4641
  • Build what YOU want,the way YOU want to,and above all-have fun!
    • View Profile
Re: April Group Build--F4U Corsair
« Reply #101 on: November 20, 2011, 03:35:11 PM »
Amazing work once again!!!
I fully agree!!! :-eek :-clap :-clap :-clap

Offline Second Air Force

  • Moderator
  • Hero Member
  • *****
  • Posts: 5777
    • View Profile
Re: April Group Build--F4U Corsair
« Reply #102 on: November 20, 2011, 03:59:59 PM »
Good to see that you have turning machine, I dream about multi practical machine for a long time. One company from Austria manufactured combination machine which sections could be assembled in various way and get turner, milling machine, drill...

Yes, I've seen this Austrian machine and it looked very nice. My Unimat has a vertical mill attachment and a lot of other parts to adapt it to most any use also. I really got lucky as a friend of a friend etc. sold this to me for not a lot of money. It's really old (early 1960s) but it works great.

Thanks for the compliments, guys--just call me the Junkyard Modeler! :-flo

Offline Second Air Force

  • Moderator
  • Hero Member
  • *****
  • Posts: 5777
    • View Profile
Re: April Group Build--F4U Corsair
« Reply #103 on: November 21, 2011, 07:06:22 AM »
Today I decided to put the landing gear back in this airplane so I could begin painting. Usually I leave the gear out until after paint, but Vought sprayed everything on the bottom of the early airplanes, including the gear and wheelwells, with the camouflage color.

When I looked at my original gear legs I realized that I no longer have the lock links for either side. First I cussed a little that I hadn't done a proper inventory of the broken model earlier. Then I remembered that there was a set of SAC metal landing gear legs among my acquisitions. These are actually designed for the Hasegawa F4U kit but I was able to modify things a bit to fit them to this old Otaki kit. This is a very nice landing gear kit and looks great after fitting it. In the first photo you'll see that I was forced to trim the lock links in order to fit them to the wing cavity. It takes away some detail of the SAC parts but was the only way I could fit them to the Otaki wheelwell.
http://i174.photobucket.com/albums/w117/2AF/IMG_8624.jpg
April Group Build--F4U Corsair

http://i174.photobucket.com/albums/w117/2AF/IMG_8626.jpg
April Group Build--F4U Corsair


After fitting the alighting gear and vacuformed windscreen (the original part was cut down for the air-racer modification) it was time to spray the underbelly with the final camo color.
http://i174.photobucket.com/albums/w117/2AF/IMG_8627.jpg
April Group Build--F4U Corsair
« Last Edit: November 21, 2011, 07:08:44 AM by Second Air Force »

Offline No.1

  • Administrator and Owner
  • Administrator
  • Hero Member
  • *****
  • Posts: 23156
  • Owner: www.letletlet-warplanes.com
    • View Profile
    • LetLetLet - Warplanes
Re: April Group Build--F4U Corsair
« Reply #104 on: November 21, 2011, 07:10:32 AM »
What I specially like is when you use product for one manufacturer and adopt to another  :-clap At least, landing gear as well other parts and elements must be the same on all kits if they are precisely manufactured  :-danger Excellent work mate  :-tri