Siemens Schuckert D.III Eduard 1/48
The brand new Siemens Schuckert D.III from Eduardis not a reboxing of the old one, but really a brand new one!
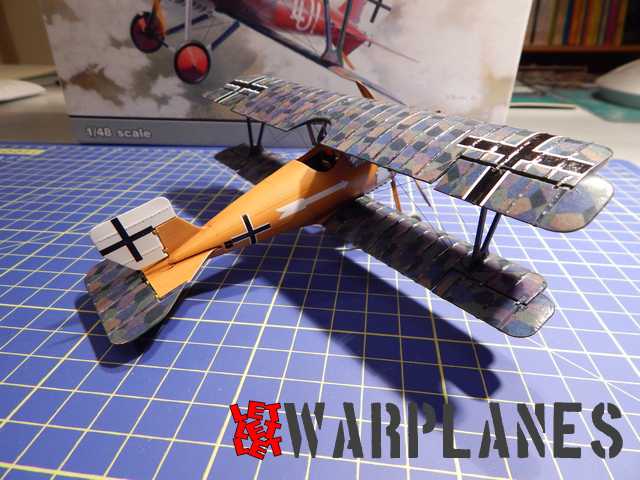
Under a very nice box art, you will find two sprues of plastic parts. There are nicely molded (engine and machineguns excepted), very fine and the ribs effect on the wings is simply stunning. You have also a little photoetch sheet and a masks sheet. Decals are very nice but, unfortunaltely, the lozenges have false colors…
Instruction manual is nicely done too, each phase being well explained. there is 5 decorations proposed. I’ve downloaded the one of the “plywood fuselage” on Eduard’site.
To complete that nice kit I will use the following brassin sets: machineguns (the box contains brassin MG but also photoetched ones) and engine. A set of “fabric” seatbelts is also available separately, but I will not use it, I prefer PE seatbelts…
First, to remove the parts from sprue. I’m working following the instructions phases. The kits seems to be very well conceived.
I always remove all the parts from sprue before painting. Just because I prefer to have some difficulties to master the painting of tiny elements than to paint on the sprue and after removing the parts to have to do corrections… Not so evident when you use washes and pastels…
Eduard provides two seats: first one is all plastic injected; second one is partially completed with a photoetched part; a prepainted one! I like the idea Eduard had to make the seat himself in plastic and the back of the seat in photoetch. The plastic part helps grandly for the glueing of the photoetch one. Well done!
So I will of course use the “improved” seat… The back of the seat was thus prepainted. During the manipulations some color was removed (see the arrow on the third photo). It’s not a problem because I had the intention to repaint all the seat in wood color using oil paints; so the back would have been repainted anyway…
In the meanwhile, brassin sets for engine and guns were washed.
The removing of the resin parts of the engine from the carrots asks for patience and attention. Take your time and there will be no problem. The first 4 photos depicts the brassin engine in comparrison with the plastic parts included in the kit. Brassin is from far better, see the cylinders!
The brassin machineguns are also better than the ones of the kit, as you can see the next 3 photos.
One thing that is lacking in the kits of WWI aircrafts using PE for machineguns is a gabarit where you can roll the part… That’s the best way to have well rolled elements. So I decided to create my own gabarit using one of the “full plastic” machinegun of the kit…
Be careful manipulating the brassin, I’ve broken a piston (Found later and glued in place) and the axe… Good cyano have corrected the problem.
I’ve also rolled the manchons of the MG…
First primer application revealed that tThe propeller haves an excess of plastic on two blades; sanding will be needed. The rest is perfectly OK…
Now, painting of the cockpit interior. I’m using Vallejo Wood as a base for painting plywood. Some parts are also painted in black. Then I’ve applied Burnt Umber oil paint in quantity with a paintbrush, then after 1/4h I removed slowly the paint with synthetic sponge, going always in the same direction. So doing the oil paint gives the effect of nerves in the wood, and you can have darker or lighter wood due to the fact you remove more or less oil paint…
Letting the oil paint drying I have worked on the brassin machineguns. Lots of details, and lots of little PE parts to glue… But those Spandaus are jewels!
The parts that have to be peinted in metal were treated with Work with Brass from Agama and Silver from Rub ‘n Buff.
As the oil paint was dry the plywood received Pébéo gloss varnish. Then I worked on the cockpit interior; parts are fitting very well!
Some problems encountered emerged then: first, the way to place seatbelts. Upper seatbelt (ventral) that is “PE3” must be placed on part “A70” of the kit. See the instruction sheet. Problem is that it’s impossible after having glued the parts of the interior of the cockpit (that is the previous phases in the instruction sheet). So I’ve decided not to do that and simply to place the seatbelt on the seat… After that, I placed the seat on the lower part of the fuselage.
Last parts of the interior are placed and half fuselages glued together.
Another problem is the poor fitting of the fixed part of the rear. That is not really good and putty will be needed. More than that I have the impression that the part is not symetric… I asked to my wife to verify and she agree with me. Fortunately the mobile part will attenuate the visual effect.
To be said that many parts are not visible in “closed configuration”, but are useful if you wish to build a Schuckert with all the panels open…
Take care also that the INTERIOR of the lower grid must be painted! I did not made that immediately, but that will be visible as you can see. So, I painted with Rub ‘n Buff after the parts were in place…
Putty was needed when assembling the wings and the fuselage. Not a big problem anyway.
Studying the next steps on the building, I have to take some decisions. For what concerns rigging, I decided not to use photoetched parts Eduard proposes: look nice, but too tiny to manipulate during the rigging phase, and it’s PE then it’s… no volume. I will work as I was working when I builded WWI fighters some times ago; so I’ve drilled holes in the lower wing.
After having masked some panels (the “metal painted” ones) I’ve airbrushed white primer. Then Vallejo wood was airbrushed on the fuselage and the propeller. …And then, Burnt Umber oil paint was generously applied on the surfaces, than removed (loooong process…) with sponge.
Letting time to oil paint to dry, I worked on the engine. The one in the kit is simply… poor.
The one in brassin is gorgeous. But not easy to build at all… I have decided to build BOTH engine so I can show the difference. See the article written about those engines.
…Another big problem with the kit is, as I said early, the lozenges: there are not correct. Eons ago on a WWI forum, Doug Baumann offered for free drawings of lozenges that are from far better than Eduard ones. So I printed those lozenges on clear decal sheets. Eduard decals will often be useful to serve as gabarits… During the long process of lozenges setting, I have also worked a little bit on the propeller (oil paint: burnt sienna) and airbrushed the brassin machineguns with gun metal.
After all the lozenges were in place, I set the other decals from Eduard (balkankreuzen, arrows…). No problem encountered, there are very fine and easy to place.
The haubaning phase followed. I used EZ Line for that; it’s an excellent product, not easy to introduce in tiny holes (no rigidity) but once it’s placed, it’s really great you can bend it without having the glued extremity that leaves its place…
Then the upper wing is positioned, then the wheel legs and wheels and finally the propeller. Kit is finished…
Well, it’s a nice little kit. The only negative points are:
– the lozenge decals (false)
– the injected engine
Brassin sets are a must as also other lozenge decals.
I recommend the kit to those who will not hesitate to envisage to buy also lozenge decals and the brassin engine set, because the kit in himself is splendid and the strong points are from far more numerous than the weakest ones…
Daniel Clamot


SO MANY THNAKS ! AND YOU HAVE DATA ABOUT A SECOND NIGHT FIGHTER BUILT FOR MRSSERSCHIMITT …ME 242 ? ME 245 ? ME 250 ?