Hawker Tempest Eduard 1169
Tempest it in 1/48 is one of few great releases which come from Eduard this year. How this happen I have no idea, I know that I have ask Eduard boss about the situation with old molds of this kit and options to get any of them. Few months after, Eduard decide to put in life batch of kits from their old molds, dated in ’90. From the very start this kit was big success as well first batch was gone in record time. So there was prepared and released second batch of this kit.
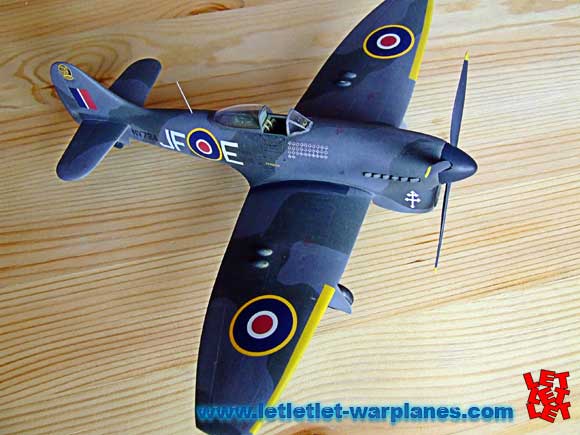
Kit I present here is their sample from Limited Edition series with stock code 1169. Inside was few plastic frets with plastic parts, protective mask, two photo etched sets, resin parts, excellent assembly booklet and perfectly printed decal sheet. No matter this is old mold, parts are so crisp and precise injected, no flush spotted. One thing is that parts are not marked with numbers so you need to take care and look at the separate printed parts numbers in assembly leaflet. One thing which I do not like is too much smooth surface so I have fine sand it for better detail overview. All parts get coat of black primer and then were separated for painting and assembly. One point which catch my eye is that most of the interior was recommended to be painted in grey color. I am afraid that I did not seen much of the interior images of Tempest V but one sample I have seen have green interior and most interesting is that there is few shades of green inside. In this way I decide to paint interior in green but please take care and make some search if possibly.
Must say that kit assembly goes fast but in my case I have gremlins who make some trouble. During the dry run of the wings, cockpit and fuselage, all sections merge perfectly but after that when I wanted to complete cements it, I have some problems to fix wing in position so I have to make some sanding. Fuselage can be completely assembled and cockpit made from resin and etched parts (replacing original plastic parts) can be attached from bottom. During the wing parts assembly, please note that two transparent parts have two light, red and blue, and I simply put two spots from inner side.
Kit offer few options for final painting and two of them are for Pierre Clostermann. I decide to make Tempest V, RAF serial NV 724 which is post-war. Pierre Clostermann’s last Tempest during the war seems to have been SN 222. Pierre Clostermann joined RAF 274 Sqn on 2nd march 1945, went to 56 Sqn on 17 March 1945 and finally 3 sqn on 8 April 1845 and left on 27 august 1945. The different Tempest V that Pierre Clostermann flew, were : EJ 781, JJ-x ; NV 722, JJ-x ; EJ 893, JJ-W ; NV 942, JJ-x ; NV 722, JJ-x ; NV 971, JJ-x ; EJ 706, JJ-x ; NV 660, JJ-x (274 Sqn), EJ 708, US-W ; NV 728, US-X ; NV 927, US-Z ; NV 965, US-S ; EJ 804, US-M ; NV 970, US-O ; NV 987, US-R ; NV 667, US-A ; SN 131, US-P ; EJ 536, US-W ; NV 968, US-G ; NV 974, US-K (56 Sqn), NV 994, JF-E, SN 222, JF-x and post-war NV 724, JF-E. GC Alsace was RAF 341 Squadron. It became officially GC 3/2 in November 1945. Specifis for the camouflage is that it have very sharp demarcation lines and I use protective tape, wide one, to protect area during painting.
As well this is old kit it have some issues. First at all I have check out general shape and it is overal good. What is the problem is the fact that many of panels on kit is overlaping and rivets on aircraft was fluch type and also with rounded head type. This is not present on kit but with some skill there should not be a problem to make all of this. Other problem I should pint is the radiator, aircraft have two type of radiator on Mk.V model and only one type was present and not much precise. Intake was not good designed and what is miss is the complete rear side with rear side of radiator, pipe as well top cover. My opinion is that Eduard could solve it better with resin parts. Also there is possible option to replace plastic landing gear bay with resin and etched parts, result would be much better. No matter of this I have managed to do some conversions and of great help was drawings provided by Arthur Bentley which is definitely best reference. No need to use any after market solutions as well total solutions would include full new fuselage, wings and tail (to resemble all panels as well rivets) and in this way we will have to pricey conversion. My suggestion is to take set of A. Bentley drawings which is amazing and do all you need by your self, with simply use of basic tools and materials.
I like this kit and I have really enjoy in build. For sure I would like to recommend this kit to you and you can order it direct from here!
Srecko Bradic
Sample kit is provided by Jan Zdiarsky from Eduard. Special thanks to Arthur Bentley for his great help and support in this build review!


