Eduard Polikarpov I-16 type 10 1/48 Weekend edition kit 8846
The Polikarpov I-16 was a Soviet fighter aircraft of revolutionary design; it was the world’s first all- metal cantilever-winged monoplane fighter with retractable landing gear. I-16 was introduced in the mid 1930s and formed the backbone of the Soviet Air force at the beginning of WW II. I-16 had a surprisingly long career from its celebrated use during the Spanish Civil War until it finally retired from the service in 1953.
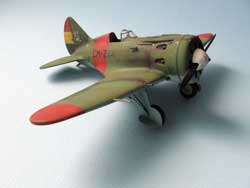 Unfortunately if you were interested in building a plastic model kit of this famous plane in 1/48 scale all you could find is old Hobbycraft (Academy) and a few vacuform kits (MPM…). Eduard’s releases of this popular fighter have put all other I-16 kits a side…
The newest addition to the I-16 family by Eduard is kit 8446 I-16 Type 10 1/48 scale weekend edition. The kit comes packed in a box with a beautiful profile of this fighter in its role at Republican’s at Spanish Civil War. The kit is beautifully molded in traditional Eduard Olive plastic with some fantastic surface detail. The panels are a mixture of fine engraving and subtlety raised panels. The representation of the fabric surfaces is superb – probably the best I’ve seen in a plastic kit, and the suggestion of the interior structure under the fabric is a real credit to the designers.
Cockpit is well detailed with excellent detailed levers, I decided to add some small pieces of wire to reproduce electrical cabling. Cockpit floor is a bit inaccurate but I decided not to touch it because if you keep the cockpit doors closed almost nothing in the cockpit is visible, including the beautifully detailed instrument panel. Eduard has provided a decal for instrument panel and I gladly used it. Installing the pilot’s seat could be a little catchy but if you carefully follow the instructions you can’t miss it. Once assembled it looks great. I glued the fuselage halves rather easy and almost no filler was needed but at the moment I supposed to glue fuselage and wings a problem occurred due to my decision to add engine and the cowling when I finish painting. I solved this quickly by adding a piece of rod from the sprue in the forward fuselage to spread the front slightly and improve the fitting. There are two injector pin marks inside of the fuselage halves and they are just the right spot to do this. Engine is well detailed and it is a shame that once installed it could hardly be visible but I like to say I know it is there. I drilled gun barrels and venture tube and replaced pitot tube with hypodermic needle. The undercarriage is precise and absolutely in scale. At the firs moment I thought it could easily snap but when I joined them it is very compact and rather strong. Undercarriage doors are a bit complicate to install but if you follow the steps in the instruction sheet it is really easy and if I may say with all those rivets look realistic and effective. At the very end I added a piece of stretched sprue from the centre of wheel hub to the small hole at the roof of the undercarriage bay to reproduce gear retraction system. I painted my RATA in AMT-4/AMT-7 scheme and applied heavy weathering as I wanted to represent a warn-off fighter.
I must state that I enjoyed assembling this kit and in near future I am going to get myself a whole range of RATA’s from Eduard production.
This kit is easy to assemble and it looks great on shelf so it is highly recommended for both novice and expert modelers!
Darko Mladenovic
Sample kit is provided by Jana Sulcova from Eduard


