Mirage III C Eduard 1/48
Mirage II C was adaptation of the A model to use Cyrano radar and first flight of this version was at October 9. 1960 from the Bourdeux- Merignac airfield and test pilot eas Jean Coureau. Interesting is to note that the fuselage was manufactured in the Argenteuil while the wings was made at NORD at Meaulte. Mirage III C was 4.25 m height, 14.73 m long and maximum take off weight were 11800 kg. Powerplant was Atar 09B-3 jet engine but to this could be add SEPR 841 start rocket. Radar on Mirage III was optimized for interception and for this was used Matra R511 semi active guided rocket. It also used NORD 5103 as well AIM-9B Sidewinder rockets. Standard equipment includes one Matra R511 rocket under the central pylon and two drop fuel tanks.
First operational squadron was equipped in July 1961. Mirage III was dedicated as defense of the French sky as well later E version due to the multi role capabilities was for the action out of French mainland. Mirage III C request less ground personnel work time then any other airplane as well it need only 15 hours of ground work for one hours of flight. Production of Mirage III ended in 1962. Operators of these airplanes were 2. and 13. Escadres de Chasse at Dijon and Colmar. They are later handed to the 5. and 10. wings ate Orange and Creil. Most of their life Mirage II spent in natural metal scheme but last time it used new blue grey pattern but for deployment in Djibouti in 1979 also two tone desert pattern. Last upgrade was in the new radios as well replacement of the old Sidewinder rockets. Last operational sortie was flown at Djibouti 12 August 1988. Among the foreigner user of this fighter was Israel Argentina, South Africa and Switzerland. “Eduard” model release for the June 2007 was scale kit of this airplane. Kt item marked as 8495 contain parts for one airplane in 1/48 scale. This is Weekend Edition series and it does not include quick mask as well photo etched parts. All parts are on nine frets and one of them contains transparent parts. Decals are very colorful and they include full stencils and data for one airplane.
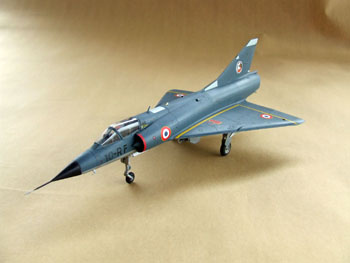 Assembly is very straightforward and easy as well instructions are detailed and precise. This airplane has most of its interior covered with two colors- black and silver. Missing thing in the interior is maybe seat belts but this could be easy made. Cockpit canopy bath is complex part as well in the rear part is the front leg bay. Before the assembly inside of the fuselage has to be fixed this interior assembly as well engine. Engine have consisted of few parts but it is enough detailed. As well this is the tricycle airplane some weight in the nose should not to be forgotten.
Alongside with fuselage and interior assembly could be also made wing assembly. Wings are made of one large bottom side part as well two of the top surface. But before glue it two assemblies have to be put inside- wheel bay. Some more care have to be take as well inside have also to be put two transparent round parts. They are close to the edge of the wing where a lot of cement is to be used so cares have to be to avoid some of the cement leaks who could damage these parts. No matter at all this is very fast and simply to assemble wings and prepare it to join to fuselage.
Inside of the fuselage have to be placed air intake duct which are placed just behind of the nose wheel bay. After that wings could be placed on fuselage. Depends of the approach in work, you can also put intake duct cones as well air intakes but also could do all of this when the wings are dry and sanded.
To get in shape on the rear of the wings have to be placed control surfaces. Due to the other parts, they are intending to be in strait position but with some skill also drop down position could be arranged. There you should take care as well these actuators which come over it have two models. One with no pylons and other with equipment pylon on it so these options have to be considered in regard of the final look of the model which we would like to have. External assemblies also include placing of the ventral fin as well couple of small devices like the airspeed tube, radio aerial… There is in the assembly instruction also put to cement cannons but I prefer to place it finally when the all airplane is painted as well they are small and of complete different color.
Landing gear is a little bit complex but not that even the less skilled modeler could not make it. Kit provides full kit of the pilot as well ladders but I did not use it. I have choice version without it, with closed cockpit and even use only one rocket just to get full appearance of the nice aerodynamics shape of this famous airplane. Finally kit is painted in the colors of the Mirage III C from EC 02/10, airplane no. 31, from Creil air base, May 1978.
This is very nice kit to build and I recommend it to everybody who is interesting in the modern jet modeling.
Author grant thanks to the Richard Fesser, former commander of the EC 02/10 for his invaluable help and info.
Srecko Bradic
Sample kit was provided by Jana Sulcova from “Eduard”



Hi Srecko, I´ve discovered your article, looking for another Mirage III enthusiasts.
I´m 43 years old, and passioned plastic modeller too, dedicated for the last twenty years, to reproduce the airplanes that served on the Argentine Air Force and Navy.
You can see some photograph of my models, in: http://www.mirageargentina.com.ar, serching in “galería de imágenes” (image gallery), and “maquetas” (models).
I´m a passioned to the aviation, and my flying experience by Private Pilot are on: Piper PA-28 Archer II, PA-12, PA-12, PA-38 Tomahawk, Cessna 152 Aerobat, C-170 B, C-182, and some flights on Blanik and Puchaks gliders.
In the last years, I re-directioned my passion to the marvel of Mr. Marcel Dassault: The Mirage III.
Srecko, I hope to still in contact !
Best regards: Cristian